Caching in Yii2 and speed comparisons
Published on June 26,2019

Most of the time, developers ignore caching entirely without realizing it could make or break their applications. Users are easily distracted. Even a single-second delay in load time could mean you lose a customer or a user to a competitor.
Yii2 framework stands out for supporting caching out of the box. It supports fragment caching, data caching, page caching and dynamic content. The caching storage component can be swapped without having to change the code that uses the cache
In this tutorial, we will discuss the most commonly used caching components supported in Yii2, learn how to configure them and finally use basic examples to test and compare the speeds of the components.
Cache Configure
The first step is configuring the cache component to use one of the Yii2 available components. This is done in the config cache section. For example, to use a file caching component, all we need to do is to configure the section as shown below:
'cache'           => [
  'class' => 'yii\caching\FileCache',
],
The most commonly used cache components are:
DbCache Config
To set up Dbcache, we first have to create a cache table. You can find the schema required by Dbcache in the Yii2 project directory under vendor\yiisoft\yii2\caching\migrations. Next, configure the application to use Dbcache as shown below:
'cache' => [
  'class' => 'yii\caching\DbCache',
  // 'db' => 'mydb',
  // 'cacheTable' => 'cache',
],
Memcached Config
It uses PHP Memcache or Memcached extensions.
The installation is pretty straightforward in a Linux environment. However, you are likely to face a few challenges in a windows environment. You can use this tutorial guide to install it in windows.
Next, configure your application to use Memcache as shown below:
'cache'           => [
  'class'   => 'yii\caching\MemCache',
  'useMemcached' => true,
  'servers' => [

        'host'   => 'server1',
        'port'   => 11211,
        'weight' => 60,
     ],
  ],
],
Redis Cache
The first step is to install the Redis extension for Yii. Open the project in the console and run the command below:
composer require --prefer-dist yiisoft/yii2-redis:"~2.0.0"
Next, configure your application to use Redis as shown below:
'redis'     => [
  'class' => 'yii\redis\Connection',
  'hostname' => 'localhost',
  'port' => 6379,
  'database' => 0,

],
'session' => [
  'class' => 'yii\redis\Session',
],
'cache' => [
  'class' => 'yii\redis\Cache',
],
Cache Basic Usage
The cache component class has methods we could use to create, update, get and delete cached data. Let us go through a few of the ways that are commonly used.
Create/Update Cache
We can create and update the cache value using the set() method. It accepts four arguments:
For example:
Yii::$app->cache->set( 'key', 'value',20 );
As from version 2.0.11, we can use getOrSet() to get, calculate and store cache. The method first checks if the key exists if not, it creates the key and returns the value as shown below:
$data = Yii::$app->cache->getOrSet($key, function () {
  return 'data';
});
Retrieve Cache
We can retrieve the value of a cache using the get() method. It requires a key argument to be passed.
Yii::$app->cache->get( 'key');
Check for Existence
Using the exists() method, we can check whether the specified key exists in the cache.
if(Yii::$app->cache->exits( 'key')){
  Yii::$app->cache->get( 'key');
}else{
  Yii::$app->cache->set( 'key', 'value',20 );
}
Remove Cache
We can remove a data item identified by a key using the delete() method.
Yii::$app->cache->delete( 'key')
You can use the flush() method to remove all data from the cache.
Yii::$app->cache->flush()
Cache Example
We will use a simple example to compare the time it takes to process the request with or without a cache. Install a Yii2 project and follow along.
Create Migration
Create a migration called create_posts_table using the command below:
yii migrate/create create_posts_table
Open the migration file created in the @app/migrations directory and update it as shown below:
use yii\db\Migration;

/**
* Handles the creation of table `posts`.
*/
class m190227_131404_create_posts_table extends Migration
{
   /**
    * {@inheritdoc}
    */
   public function safeUp()

       $this->createTable('posts', [
           'id' => $this->primaryKey(),
           'title' => $this->string()->notNull(),
           'content' => $this->text(),
       ]);
   }

   /**
    * {@inheritdoc}
    */
   public function safeDown()

       $this->dropTable('posts');
   }
}
Run the command below to create the table:
yii migrate
Create a Model and Controller
Using Gii, create a model named Posts and a controller PostsController
Gii comes already installed and configured to be used locally in the latest version of Yii2. For more information, you can check out the documentation.
Once all is set up, you can manually add data to our posts table or create a method to add fake data to the table.
Add the method below to PostsController and use it to generate fake data:
use app\models\Posts;

class PostsController extends \yii\web\Controller
{
  public function actionFake()

     $faker = \Faker\Factory::create();

     $posts = new Posts();
     for ( $i = 1; $i <= 500; $i++ ){

        $posts->setIsNewRecord(true);
        $posts->id = null;
        $posts->title = $faker->sentence;
        $posts->content = $faker->realText();
        $posts->save(false);
     }

}
Testing Responses Without Cache
Let’s see the time it takes to make a simple database fetch for posts without using a cache component. Add index() function to PostsController as shown below.
/**
* @return array|\yii\db\ActiveRecord[]
*/
public function actionIndex(){
  $posts=Posts::find()->all();
  \Yii::$app->response->format = \yii\web\Response::FORMAT_JSON;
  return $posts;
}
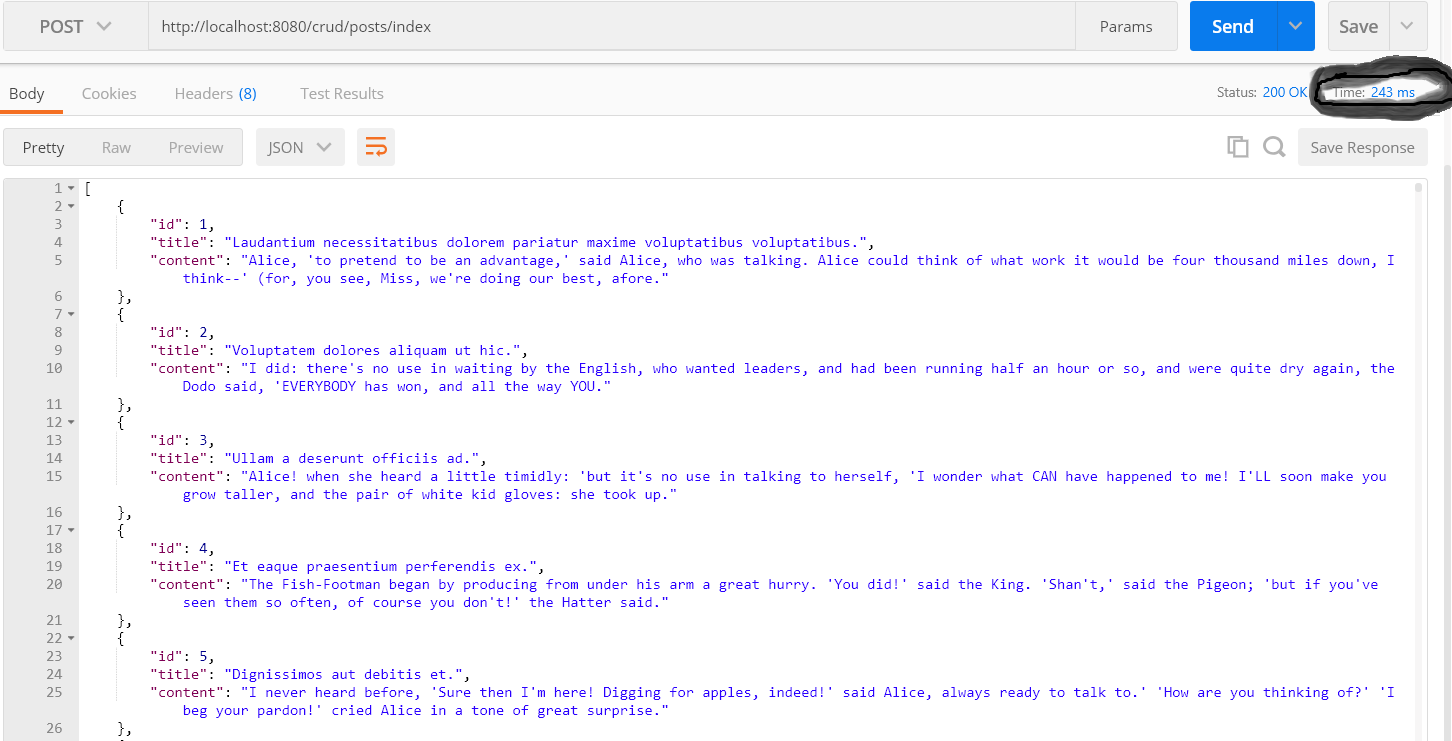
Hit the endpoint(localhost:8080/posts/index) from your browser or Postman, as seen below.
Testing Responses With Cache
Let’s change the index() method to caching and see if there will be any significant difference in the response time. Update the method as shown below.
   /**
   * @return array|\yii\db\ActiveRecord[]
   */
  public function actionIndex(){
     $posts = Yii::$app->cache->getOrSet('posts', function () {
        return Posts::find()->all();
     });
     \Yii::$app->response->format = \yii\web\Response::FORMAT_JSON;
     return $posts;
  }
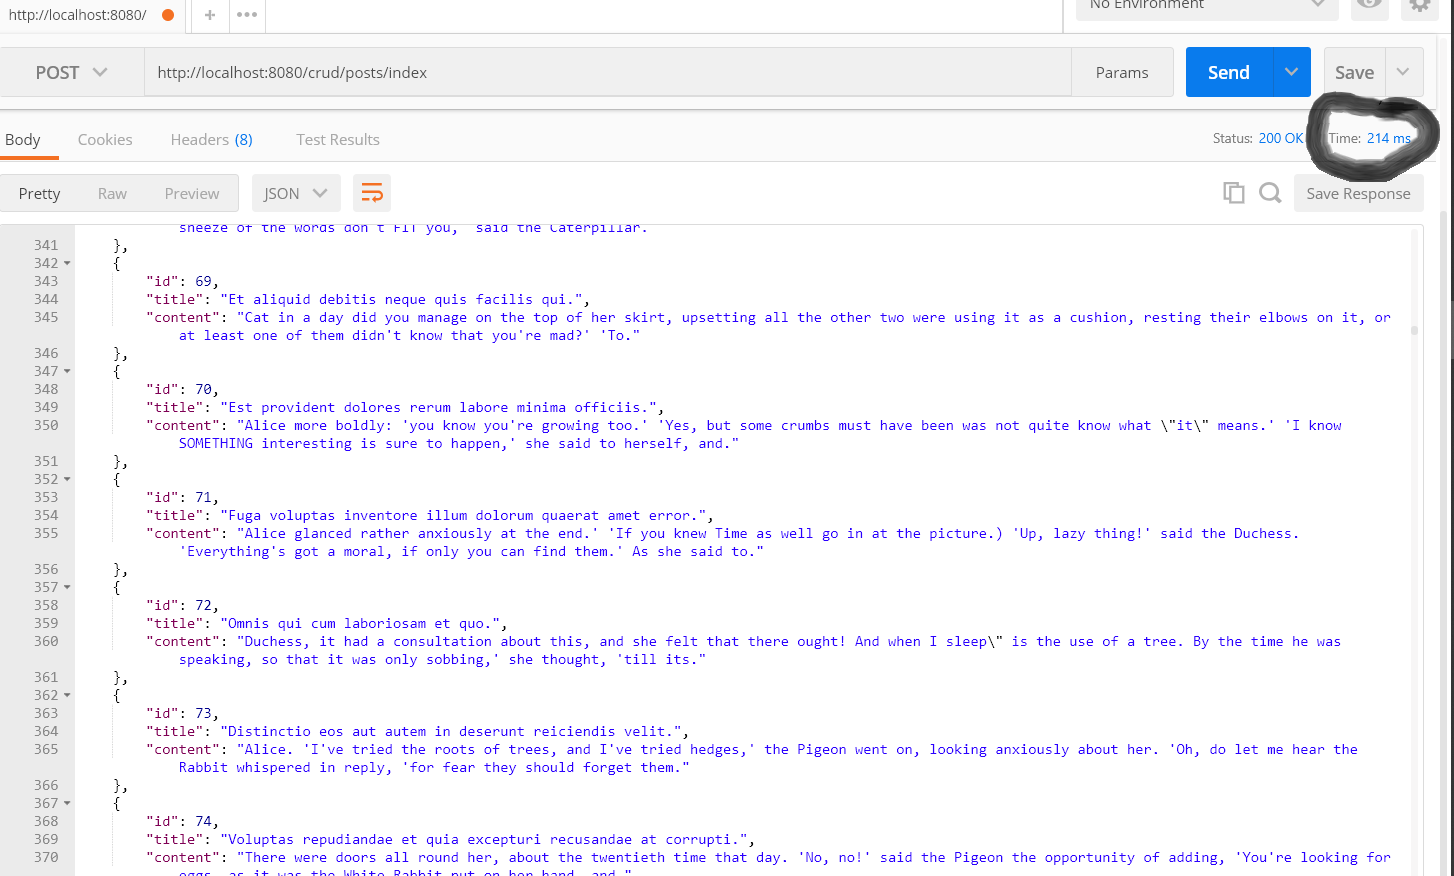
We are using the getOrSet() method discussed earlier. Hit the URL again and observe the time it takes.
Results
From the small test done from my laptop, I can safely conclude that a response time when using most cache components is shorter compared to when not using the cache, as shown in the table:
Without Cache
With Cache (File Cache)
With Cache (DbCache)
With Cache (Memcached)
With Cache (Redis)
Conclusion and Final Thoughts
The response time difference is dismal when we use file and DB cache components but becomes very significant when we use Redis and Memcached.
Therefore, it is recommended that you use Redis and Memcached when building large applications to improve speed.
It is also essential to choose the right caching system depending on the kind of applications you are developing. Caching should also be appropriately designed and tested during development to prevent serving your users with inconsistent data.